Follow me on Twitter

Thursday, August 29, 2013

Cloudberry/Salmonberry/Akpik Jam Recipe

Quick post!

We are busy busy busy, processing meat for the winter, picking berries and freezing them too, prepping the chicken coop, working on vehicles and basically running around babbling and surviving off off coffee and quick meals.

This year I didn't get to do my usual slew of floral jellies but I am going to get to do my berry jellies and jams.  I thought I would share the cloudberry recipe. Cloudberries are the arctic most beloved of berry!  They are also called salmonberries (though they are a different berry) or Akpiks in our language.  This year was a good berry year!


4 cups of berries
1/2 lemon or a couple of tablespoons* of lemon juice
1/2 tablespoon of butter
1/2 packet of Surejell pectin
4 cups sugar

*I guess abit on the amount of lemon juice! You just need a good splash of it in there.

Set aside two cups of the berries - I choose the 'pretty' ones without blemishes and cleaned of leaves and such.  Take the other two cups and press them through a strainer, retrieving as much of the pulp and juice as is possible. Take your time. I repeatedly mix the seed/pulp with water and then press through the strainer.  Take the juice/pulp and add clean water to it to make two cups of juice.

Add this juice and the berries to a small saucepan (big enough to handle twice as much as the juice and berries) . Add lemon juice, and boil for 2 minutes. Add butter and stir till melted (you can omit the butter, it is just there to reduce the amount of foam). Add Surejell and stir and boil for 1 minute.

Add sugar (you can add more sugar, about 6 cups total to get more jam, but I like mine to be more intense berry flavor, do not use less than 4 cups because the sugar is needed to prevent the berries from going bad.)  Boil for another minute while stirring slowly.

Makes about 6 cups of jam, or a little more than 32 oz. 

Notes:

Put in hot sterile jars if you plan to preserve them and you can hot process them in a hot bath to ensure they will stay safe.  I sell some jam online but most of it is eaten up right away and it never lasts long.

You can strain ALL of the seeds out to make a very, very pretty jelly!

You can also save the seeds, grind them up to  powder and mix them with a  little bit of olive and and use them to buff the dead skin away from your face, they contain all types of anti-aging goodness that brighten your skin!

And now some pretty cloudberry pictures!


Friday, August 9, 2013

Giant Garden post

I thought it was about time to do a good post on my tiny garden!

Here is a layout drawing of the plants I grew and the location of these plants.


This year I decided to try and to begin to improve my soil from the get go.  Our soil here is very nitrogen and nutrient poor.  It also lacks organic material.  Most of the wild arctic plants grow in the thin topsoil layer that consist mainly of dead plant material and rabbit and ptarmigan poo and such.  This year I added a ton of coconut coir which was cheap to buy and ship and which expanded into larger quantities.  I also mixed in worm castings, a sprinkle of bone meal, blood meal, kelp meal, and a good quality organic fertilizer.  I chose to use organic enhancements in the hope that they would add to the soil in later years as well as this year.  I plan to add these types of stuff to the soil every year. 

Last year I started a small compost bin, using the dead plants and home scraps, coffee leavings and such.  It is basically a 30 gallon plastic bin with a lid in which I have drilled a ton of holes.  I opened it up at the beginning of spring and was extremely surprised to get the wonderful earthy rich smell of awesome compost and steam.  I started another separate bin this year, and will add to that the chicken poo and straw and such.  I plan to let these bins sit for two years, so next year I can start using the compost.

I started planting seeds as soon as the soil was ready and warmed.  I cheated a little by covering the beds with cheap plastic, which helped to heat the beds and the seeds faster.  For the hot weather plants like the tomatoes and squash and peppers I made small sturdy tents out of plastic and placed them around large bottles of water to help keep them from getting too cold.  The only plants I lost were the winter squash, which really did NOT like the sudden drops in temp.

We started eating from the garden about three weeks ago.  It started with lettuce and herbs but now I can harvest things almost every day, the chickens have been loving the excess or damaged greenery.  The only problems I have had were mysterious insect holes showing up on my turnip leaves, a occasional rabbit wondering in and eating the chard (oddly enough the chickens go nuts and scare it away!), the occasional drop in temps, and a dog dumping out the lavender plants and killing them. 

I have found that 90% of my plants absolutely do better in cooler weather.  We had couple weeks of 75-85 degree weather and though the herbs and sunflowers did okay, everything else went dormant and looked quite poor.  Then when the fall time coolness and humidity rolled in they came back to life in a frenzy.  The sweet corn did well in the heat but we got a drop in temp and it pretty much disabled the corn.  So I pulled the baby corn and replaced them with winter rye.

This year I also installed a rain gutter system, which was the absolute best idea ever! Last year I was hauling water in the hot spells from the nearby river to my water tank.  Which made interesting things grow in my beds.

Next year I plan to build a small greenhouse around the beds in the northwest corner of the garden.  I plan to put the corn, peppers and cucumbers an such inside. Since my husband was so incredibly sweet to me and built me the absolute best fully insulated chicken coop, I pretty much have to wait till next year to bother him again!

And now some pics!

I have about 30+ green tomatoes growing on my six tomato plants

Broccoli

baby squash!

Thought I would throw a pic of the inside of the coop in the post.  I LOVE the coop!  The food and water are hidden by the wall.

One good days worth of yummy!

Chard, a new favorite of mine that really reminds me of my grandmother.


Saturday, June 29, 2013

quick garden and chicken pic post!

The finished insulated coop front.
The chicks aren't really chicks anymore! 
Baby Kale
Baby sunflowers
My first tomato babies have arrived!
The finished coop and run in the back with some of the garden.  You can see my mini-compost blue bin.  It's working great!
The chickens first steps into the run.
With the crazy weather we have been having we decided to invest in a really awesome inflatable kayak. Here is the Hubby and my youngest brother testing it out.  This thing is SO much fun!


Our weather has been horrendous to say the least! we had two weks straight of 80-95 degree weather, which finally broke this last weekend.  Which was fortunate since we had three days of smoke filled skies from all of the fires that spread across the interior of Alaska. Some places south f us were reporting temperatures of 140 degrees in the sun. Which is horrible! 

We built the coop and started the garden which is why I have been MIA for awhile. The plants and chickens are doing great! We still have to finish some parts of the coop but we are pretty much set up.  Just in time for mosquito season! I have lost count of the bug bites I have but I am very happy that everything is set up and will need little upkeep for the worst part f the summer.

I hope to be able to getting around to doing a more in depth post about what I planted this summer, so far everything is doing great with the heat. 

Stay COOL people!  Don't let the whacky weather get to you!

Monday, June 10, 2013

Springtime? O.o pics...

 I ...hope.....it's finally spring!  It feels like spring.  But the last time it felt like spring we suddenly got a week of snowy blizzards.  Every moment is spent fixing up the garden and setting up the chickens.  My superman of a husband built a fully insulated chicken coop.  Complete with a small storage space and window.  We haven't completed it yet but enough of it is done to house the growing chickens and keep them safe from the resident weasel and the flock of migratory ravens.  I'll get better pictures once it up!

The garden is slowly coming together.  I lost quite a bit of my seedling in the 'great flash freeze of 2013' but I was able to revive a few and so far just lost a handful of the more delicate squash.  There is absolutely nothing more tedious than hardening seedlings! 

The chicken coop in the process of being built.  A carpenter husband is incredibly valuable!

The plants seem to say that it's finally spring, as they hesitantly green themselves up

everywhere we look is hints of green.

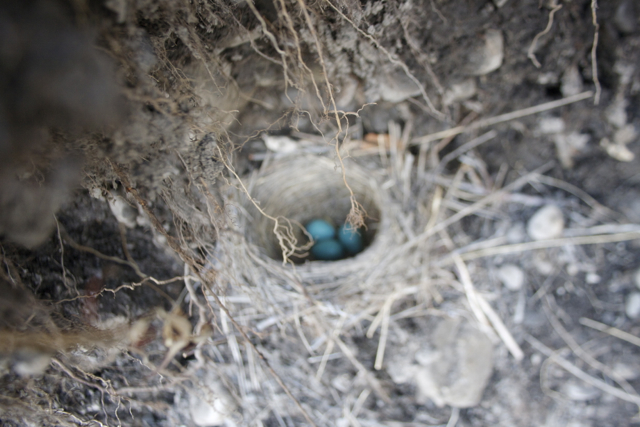
We found a robins nest hidden amongst a gravel slope.  We vowed to keep it's location a secret.
Springtime here means occasional showers and thunderstorms.